You wake up on a spaceship filled only with women travelling to another planet, unaware of how you got there.
You must navigate your days aboard the Endurance, making key decisions about your relationships with your shipmates,
while trying to figure out the larger mysteries at play involving your reason for being on the ship,
and why its destination to the sanctuary planet of Elysium isn’t going according to plan.
You are Stranded in Space!
Installation:
1- Extract and run.
Developer: WildMan Games
Censored: No
Version: Days 1-18 Elysium
Language: English
Genre: 3dcg, male protagonist, sci-fi, big ass, big tits, teasing, animated, vaginal sex, oral sex, creampie, romance, dating sim, titfuck, handjob, interracial, adventure, fantasy, voyeurism
Day 17
Music added
Escape Room hints system added
Days 1-8 images have all been improved
Days 1-8 writing = more consistent to subsequent days.
“Tips” menu added to main menu
All text, even unseen, can be skipped with ctrl, cmd, or hitting the skip button
Scroll bars added to all group chats and pm windows
Unscramble word game simplified
Timer removed from sliding puzzles
Paige battle minigame – HP of both MC and Paige reduced (quicker games)
Full unlocker added to gallery – it takes a little click of a dot on the screen itself
Day 12 Mysterious Girl Unscramble Answers
Hidden letters:
1) HMCOPNAI, 2) RELUOWPF, 3) RITPSHOE
SPOILER: Solution
1) CHAMPION, 2) POWERFUL, 3) TROPHIES
- Support Developer of this game:
- Patreon
Download for Windows/ Linux
Download for Mac
Download for Android
- swipe down to hide the ui
- swipe left to roll back
- swipe right to start skipping of text
- swipe 2x left&right to open the game menu
- swipe up&down to toggle a small window with memory usage information
- longpress the save file thumbnail in the save/load screen to delete this slot
Download Escape Room Spoiler Walkthrough
- When you first arrive, click the ↑ arrow once.
- Turn ← and then click on the Tire.
- Click the Tire again, and then take the flimsy key (roughly the center of the screen).
- Click ↓ twice to back out again.
- Go ↑ once and click the Barrels, where you will see each has two magenta caps.
- Click the top cap of the right barrel, and you’ll get a clue.
- Back out with ↓ twice, and then turn ← once.
- Just above the rubble in the back right corner is the lid to a Wooden Chest sticking out; click on that.
- Click on the Bookcase against the far wall.
- Go to the 4th row from the top. Click on the Brown Book that’s farthest to the right.
- Click the ITEMS button in the bottom left, and then click the notebook to select it.
- The notebook should show as “EQUIPPED” with its icon at the bottom of your inventory and a small description to the right. Click the magnifying glass in the bottom corner of that icon. Read through the clues provided there.
- Click the red X to close the notebook. If you want to, you can close your inventory with the ITEMS button.
- Go ↓ and then → to see a Wooden Chest; click on it once.
- Click on the lid of the Wooden Chest.
- Back out with ↓ four times.
- Click ↑ and then find a small number 8 in the upper left of the rubble; click on that.
- Go ← and then click the keypad on the door.
- Go ↓ followed by ←, and then click the Shopping Cart (Trolley) on the left side.
- In the front of that, click on the hammer.
- Go in these directions: ↓, ←, ↑, and →.
- Click on the large set of Lockers, and then do it again when zoomed in.
- If it isn’t already, open your inventory (ITEMS button) and select the flimsy key (that you found in the tire).
- Hover over the locker you saw in the clue from the barrel cap (i.e., in the 2nd column, 3rd row) and click on it.
- Click on the stepladder to add it to your inventory; click the stepladder in your inventory to equip it.
- Back out with ↓ and then click the Colored Squares.
- Click the Lockbox once and then go ↓ twice.
- Click the Metallic Boxes, and then click the bottom edge of a Safe (on top of the third box from the left).
- Click the safe’s door, and the grab the coins inside.
- Move 7 times: ↓, ←, ↑, ←, ↑, ←., and ↑.
- Turn → and click on the Red Mat (rectangle).
- Go to ITEMS and equip the notebook.
- Move forward with ↑ and look you’ll be in front of a GIVE UP Sign. Look down using the ↓↓ symbol.
- Back out using ↓ and turn → next.
- Click on the Overturned Garbage Bin five times in a row. (You get the number 0.)
- Click ↓ to turn around, and then click the Side Desk on the right of the screen.
- In the bottom left corner, click on the Simon-style Color Memory Game disc.
- From your ITEMS, equip the coins by clicking on them.
- Hover over the slot in the center of the memory disc and click it.
- Play the memory game using the disc.
(Note: This is a 10-color sequence that varies, so you may want to write it down.) - From the small compartment that opens, click on the sticky note.
- Back out ↓ twice, and then click the ↓↓ symbol again, and back out with ↓ one time.
- Equip the notebook via inventory, and then move in the following sequence that the notebook shows.
(Note: This is a sequence of 15 moves that varies, so you may want to write it down.) - Return to the other room and get to the GIVE UP Sign again.
- Once again, click the ↓↓ to look at the green mat; click the sticky note that’s appeared.
- Back out with ↓, and then go ↑ twice.
- Click on the Space Suit, equip the hammer, and click on the suit’s visor (face covering).
- From the skull’s eye socket, grab the fishing hook.
- Move first with ↓ and then using →.
- Click the pair of green dumpsters, and then click the Left Green Dumpster.
- Use ↓ to back out again, and then click the Right Green Dumpster.
- Make sure the inventory is closed, and then on the left will be a solid key; click on it to obtain it.
- Use ↓ twice to return to see all the garbage bins, and then click on the Red Dumpster.
- Click on the control panel in the bottom right corner, then click it again once zoomed in.
- Back out once with ↓ and click on the packing peanuts.
- Click the ITEMS button and equip the notebook from the inventory.
- Use ↓ to return to viewing all three garbage bins.
- With the notebook still equipped, click the magnifying glass beside its icon. (See Step 12 above for reference.)
- At the bottom of the page that shows, click this text:
(Hold this facing two green, one red…) - The notebook should automatically close, but it’s still equipped. Click ↓ twice.
- Go ↑ once and click on the backpack to obtain a screwdriver; go to ITEMS and select it.
- Use ↓ once, and then click the Red Dumpster again.
- Click on the control panel again, and then once more after you’re zoomed in.
- Select the green dumpster button, and then use ↓ to back out once.
- Click inside the dumpster (the open top of the dumpster) and take the pole.
- Click ↓ twice to see all three garbage bins again, and make sure the inventory is closed.
- Before we leave the area, click on the 3 _ _ _ writing in the bottom left corner of the Left Green Dumpster.
- Move ↓, then ↑, and finally ←.
- Click the Bookcase, go →, click on the Wooden Chest.
- Equip the newly acquired solid key from the inventory, and then click on the chest’s lid.
- Click on the sticky note inside the chest, and then move like this: ↓ , ↓, ↓, ↓, ↑, →, and ↑.
- Look at your ITEMS and equip the fishing pole.
(Note: The hook you had was automatically combined with the pole from the Red Dumpster to give you a fishing pole.) - Click on the middle three windows of the train. (You’ll get another sticky note, combining with previous ones.)
- Go ↓ and then ↑, and click again on the door’s keypad.
- From the inventory, select the sticky note and click the magnifying glass (like you did for the notebook earlier).
- Click the zoomed-in keypad once, and then click the numbers shown on the sticky note.
(Note: You must click the # key after inputting all four numbers. If you make an error, the * key lets you start over.) - Move ↑ once and click the Stay button.
- Turn ←, click on the scroll, and then click it again when zoomed in.
- Go ↓ four times, and then move ↑ and then →.
- Click the Colored Squares again; you can now click individual squares to cycle through a series of colors.
(Note: The clue from the scroll will be displayed for you. The solution is as follows.)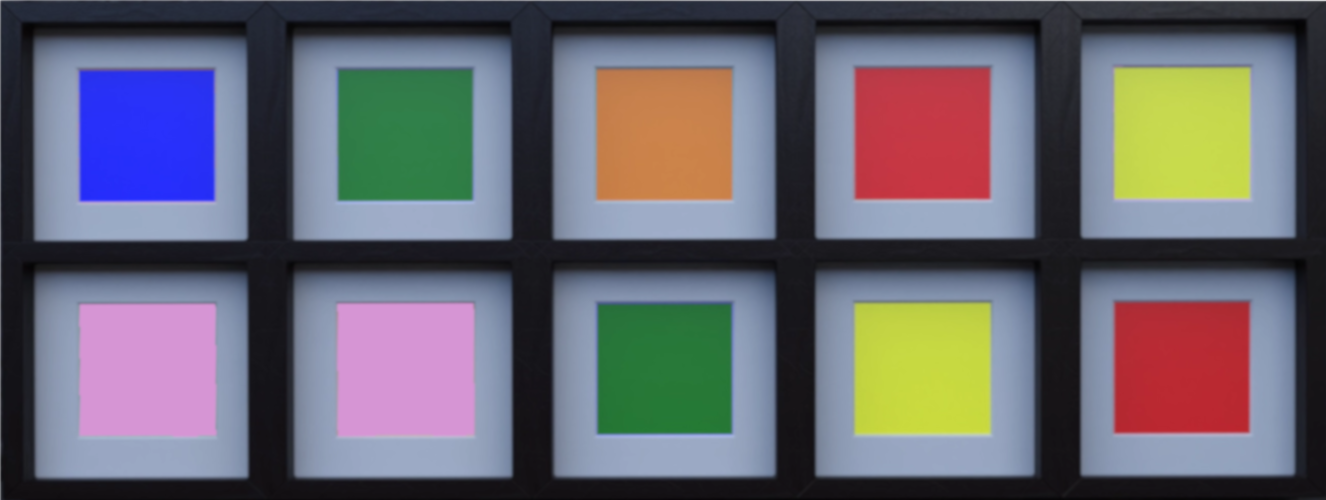
- The final non-escape room number to get is found somewhere among the random other items you can click throughout the various areas. I’ve found it in the sack (near the Space Suit), via the wooden box beside the sack, and on one of the server clusters. Since it randomizes, just click things you’ve not yet examined until you find it.
(It will be obvious when you’ve found it if you read the dialogue with each item you click. The number is 9.) - Return to the door that had the keypad and use ↑ to step through.
- Click the Leave button to exit the escape room.
Download Gallery Unlocker
Installation:
Extract file from file to the \game folder and overwrite when prompted.
You can also mail us at :- dikgames.play@gmail.com
Editor's Rating
Story - 84%
Visual - 91%
Engagement - 85%
Core Loop - 85%
86%
out off 100%
This review is based on author's perspective and actual experience may differ on individual's own preferences.








Game sucks. Emasculated MC as usual, no interaction, not into girls that look like liberals with weird colored hair. Been “playing” for like an hour now and haven’t had a single dialog choice. Deleting this trash from my computer now. The tag “kinetic novel” should be added to this “game”.
Wow, lots of reading, there are few, if any choices other than who to text on any given day.
any chance we are gonna get day 18?
so the dev created only 4 days in about a full year… talk about slow.
crap boring as hell
New update is out nearly a month now…
Day 17 is out please update it
Day 17 out now.